
In this guide you can find how to resolve the following issues.
- request a new certificate
- set up Nginx to enable your certificate
- check SSL configuration rating on your HTTPS site
- renew a certificate
Request a new certificate
Get certbot
Go to any directory and clone repo with sources.
cd ~
git clone https://github.com/certbot/certbot
Directory certbot will be created
Request a certificate
Put a domain name into a variable.
DOMAIN=example.com
Go to certbot's directory
cd certbot
Request a certificate for your domains. You don't need to edit this command
./certbot-auto certonly --manual -d *.$DOMAIN -d $DOMAIN --agree-tos --manual-public-ip-logging-ok --preferred-challenges dns-01 --server https://acme-v02.api.letsencrypt.org/directory --register-unsafely-without-email --rsa-key-size 4096
You will see a block with value for a new DNS record.
-------------------------------------------------------------------------------
Please deploy a DNS TXT record under the name
_acme-challenge.example.com with the following value:

qqiR_lsa2AjMfoVR16mH4UDbOxy_E02l0K1CNyz1RdI

Before continuing, verify the record is deployed.
-------------------------------------------------------------------------------
Press Enter to Continue
Open a DNS panel for you domain name and add a new TXT record. Then go back to the terminal and press Enter. You will be asked to add another one record.
Vscale Panel for example:
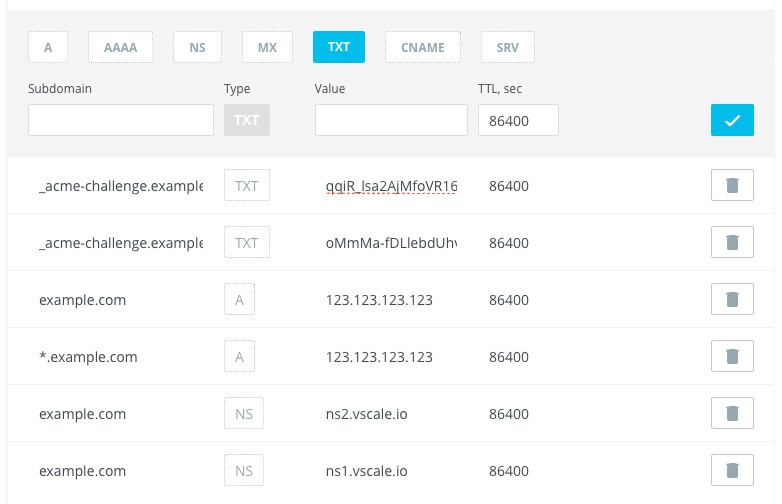
Before pressing Enter the second time you can check if records were deployed. Open a new terminal window and run the following command.
host -t txt _acme-challenge.example.com
You will see a response from the DNS with your values.
_acme-challenge.example.com descriptive text "qqiR_lsa2AjMfoVR16mH4UDbOxy_E02l0K1CNyz1RdI"
_acme-challenge.example.com descriptive text "oMmMa-fDLlebdUhvhMD5MinJ2EeFpdP0F9lUPTShh4w"
If these records are correct then press Enter and see the result of issuing.
Waiting for verification...
Cleaning up challenges

IMPORTANT NOTES:
 - Congratulations! Your certificate and chain have been saved at:
   /etc/letsencrypt/live/example.com/fullchain.pem
   Your key file has been saved at:
   /etc/letsencrypt/live/example.com/privkey.pem
   Your cert will expire on 2018-06-11. To obtain a new or tweaked
   version of this certificate in the future, simply run certbot-auto
   again. To non-interactively renew *all* of your certificates, run
   "certbot-auto renew"
 - If you like Certbot, please consider supporting our work by:

   Donating to ISRG / Let's Encrypt:   https://letsencrypt.org/donate
   Donating to EFF:                    https://eff.org/donate-le
Congratulations. You have got a new wildcard certificate for your domain example.com and its second-level subdomains *.example.com.
Set up Nginx
Now we need to add a new snippet with ssl-params.
Go to snippets directory and create a new one.
cd /etc/nginx/snippets
nano ssl.conf
Add the following lines, save and exit the editor (Ctrl+X, Y, Enter).
ssl_session_timeout 1d;
ssl_session_cache shared:SSL:50m;
ssl_session_tickets on;

ssl_protocols TLSv1.2;
ssl_ciphers ECDHE-RSA-AES256-GCM-SHA384:ECDHE-RSA-AES256-SHA:ECDHE-RSA-AES256-SHA384;
ssl_ecdh_curve secp384r1;
ssl_prefer_server_ciphers on;

ssl_stapling on;
ssl_stapling_verify on;

add_header Strict-Transport-Security "max-age=15768000; includeSubdomains; preload";
add_header X-Frame-Options DENY;
add_header X-Content-Type-Options nosniff;
Then you have to create a directory for certificates snippets.
mkdir certs
cd certs
Create a new file that will hold certificate's params.
nano example.com
Add paths to the wildcard certificate.
ssl_certificate /etc/letsencrypt/live/example.com/fullchain.pem;
ssl_certificate_key /etc/letsencrypt/live/example.com/privkey.pem;
ssl_trusted_certificate /etc/letsencrypt/live/example.com/fullchain.pem;
Usage
Now you have to include params in site's config.
Separated http and https servers
server {
    # Listen default port for http
    listen 80;

    # Server name for this config
    server_name example.com;

    # Force redirect to https
    rewrite ^ https://$server_name$request_uri? permanent;
}

server {
    # Listen https connections
    listen 443 ssl;

    # Server name for this config
    server_name example.com;

    # Include common ssl params
    include snippets/ssl.conf;

    # Include certificate params
    include snippets/certs/example.com;

    # Your custom nginx params for the site
    # This case returns page with a plain text
    add_header Content-Type text/plain;
    return 200 "Hello, World!";
}
Single server config for a site
server {
    # Listen default port for http
    listen 80;

    # Listen https connections
    listen 443 ssl;

    # Server name for this config
    server_name example.com;

    # Include common ssl params
    include snippets/ssl.conf;

    # Include certificate params
    include snippets/certs/example.com;

    # Force redirect to https
    if ($scheme != "https") {
        return 301 https://$server_name$request_uri;
    }

    # Your custom nginx params for the site
    # This case returns page with a plain text
    add_header Content-Type text/plain;
    return 200 "Hello, World!";
}
Result
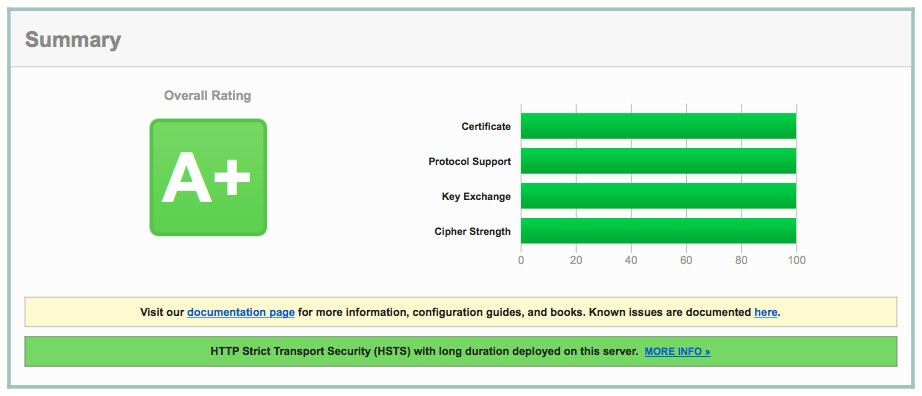
This guide can help you get an A+ rating on test by ssllabs.com
Renewing certificate
There are no methods to automate DNS verification, so at time X you can request a new certificate again via step 2. Local certificate will be updated. Do not forget to reload nginx service.