Sometimes you need to add a video example to the readme. GitHub only supports three types of media content in md files: static images, static svg graphics, and gifs. Therefore, we will have to convert the recorded video from mp4 or mov to gif.
As examples in this article, I will use static images from videos.
Tools we need
To repeat the examples from the article at home, you will need two things:
- any source video: screen recording, from a camera or video from the Internet;
- FFmpeg utility installed.
FFmpeg is a free and open source utility for manipulating video and audio files.
You can download the binary from the official site or install it via package manager. Mine was installed via NPM as a global package.
What is the problem
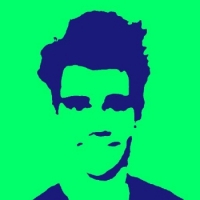
Here is a frame from the demonstration video for a readme.
If you convert the video directly to gif with default settings ffmpeg -i demo.mov demo.gif, then with a high probability you will get a gif with a very poor color quality. Same result you will get by using any online converters because they work this way.
See those dotted gradients and background?
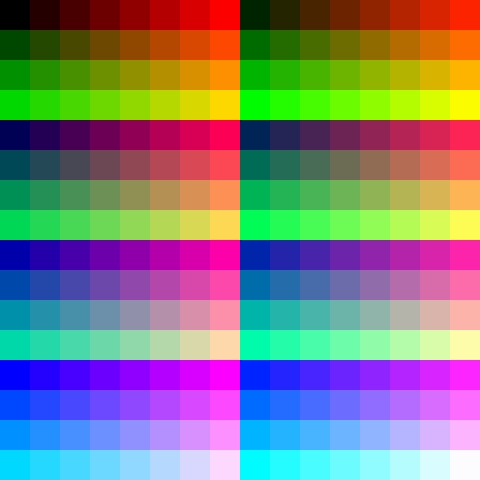
That is because GIF images can have a total of 256 colors. A 16x16 pixel palette file is used for encoding.
But we have the option to apply a custom palette to our video.
Generating custom palette
Let's move to the console and create two variables. One with the title of the original video. And the other will be the name of the palette.
FILENAME=demo.mov
PALETTE_FILE=$FILENAME.palette.png
Now let's generate a palette based on the colors of the source video.
ffmpeg -i $FILENAME -vf \ scale=flags=lanczos,palettegen $PALETTE_FILE -y
We now have a 16x16 image that will be used as a reference when encoding the GIF.

And now, using this palette, we will be able to keep most of the original colors from the video.
Converting the original video to GIF format using the palette.
ffmpeg -i $FILENAME -i $PALETTE_FILE -filter_complex scale=flags=lanczos[x],[x][1:v]paletteuse $FILENAME.gif -y
I deliberately suggested using variables in the code, because that way it would be generic and the filenames would reflect the content:
- demo.mov — original video;
- demo.mov.palette.png — generated palette for the video;
- demo.mov.gif — converted gif file.
Result
Using the custom palette you will get the best result for the output gif video.

Of course, the gif color space is still limited to only 256 colors, but we have chosen the most necessary ones.
Reducing size
If you want to improve something to reduce the size, you can lower fps or change resolution.
For example. original demo.mov file has 60 fps frame rate. The output gif has the same rate. But if you define the fps to 24, the gif size will be reduced. For demo purposes you can use even less frames per second in favor of saving space.
To define fps use the filter fps=12. Find the good value for your purposes.
ffmpeg -i $FILENAME -i $PALETTE_FILE -filter_complex fps=12,scale=flags=lanczos[x],[x][1:v]paletteuse $FILENAME.24.gif -y
You can also change a resolution of the output file by defining the resizing params: scale=-1:240 — resize to CALCx240 px.
-1 means flexible value to scale proportionally based on the new value of the second side.
ffmpeg -i $FILENAME -i $PALETTE_FILE -filter_complex fps=12,scale=-1:240:flags=lanczos[x],[x][1:v]paletteuse $FILENAME.24.gif -y
Whole code again
Define input file name as variable.
FILENAME=demo.mp4
Create a variable for a palette name.
PALETTE_FILE=$FILENAME.palette.png
Generate the palette.
ffmpeg -i $FILENAME -vf \ scale=flags=lanczos,palettegen $PALETTE_FILE -y
Convert video to gif with a palette.
ffmpeg -i $FILENAME -i $PALETTE_FILE -filter_complex scale=flags=lanczos[x],[x][1:v]paletteuse $FILENAME.gif -y
Done.